Thrive Automator gives us the ability to map custom fields from internal forms or external tools like ConvertBox directly to our autoresponders. This is an awesome way to pass data through your site if you're going to use that same data to create or identify users and add them to courses.
Check out the video version of this tutorial below.
Autoresponders that Thrive supports for custom field mapping
Thrive has built API connections to only a handful of autoresponders / email marketing tools. These are, however, some of the big names in the business. So chances are, most people will be covered by one of these integrations.
These supported autoresponders can be found in Thrive's Knowledgebase here. At the time of writing this tutorial, these autoresponders are listed below:
- MailChimp
- Aweber
- ActiveCampaign
- GetResponse
- ConvertKit
- Mailerlite
- Campaign Monitor
- SendInBlue
- Zoho
- Drip
However, if you're like me and you use FluentCRM, we can still map custom fields from our Thrive Forms and external tools using Thrive Automator. Check out the external tools option below. It works just as well!
Internal Forms built with Thrive Architect to Supported Autoresponders
If you have a form that you've created that has data you'd like to pass to your autoresponder, all you need to do is grab the form identifier (left sidebar, advanced, with the form selected).
Form Submit Trigger
In Thrive Automator, create a trigger in your automation for "Form submit".
We don't want this to trigger on every single form submit, so we select the form by its identifier.
Add an Action: Add to Autoresponder
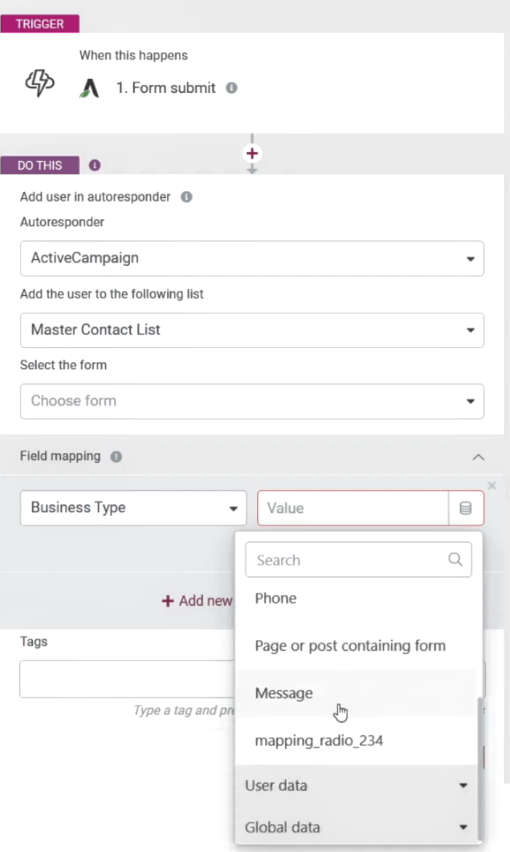
Since this method is for supported autoresponders like ActiveCampaign, it's pretty simple. Select your autoresponder from the dropdown.

Add them to your list and tag as desired.
Find the "Field mapping" bar and drop that down.
Here we can map our custom fields that are in our autoresponder and choose the data from the form.
Select the 'insert dynamic data' button to the right of the Value field. Drop down Form Data. Now map the data from the from to the appropriate custom field(s).
Internal Forms for Unsupported Autoresponders
We can still use the internal Thrive Forms and send data to unsupported autoresponders, but instead of using the "Add user to autoresponder" action we're going to send a webhook.
For the action, select "Send webhook".
Here we paste in the link from our autoresponder (In our case, FluentCRM > Settings > Incoming Webhooks).
For the Fields section, we want to map our Key/Value pairs. The Key will be dictated by your autoresponder.
For the value, click the insert dynamic content button to the right of the value field. Go to Form Data. Map the data from the desired fields that you wish to be populated in the custom field in your autoresponder. You're all set.
Note: Your autoresponder must support incoming webhooks. FluentCRM DOES support incoming webhooks, and can make custom fields through them.
External Tools Through Webhooks
Using external tools and an autoresponder that doesn't support direct custom field mapping with Thrive Suite requires us to make one tweak to our original automation above.
Incoming Webhook
Instead of "Form Submit", we're going to use "Incoming Webhook". Here are are given a webhook link that our external form tool, like ConvertBox, will use to send data to Thrive Automator.
If you know your Key and data type, you can input those manually. Otherwise, click the "listen" button and send a test to the webhook url from your external tool. This will automatically populate the data you need.
Sending to Supported Autoresponders
You can follow the instructions above for internal forms using supported autoresponders.
Sending to Unsupported Autoresponders
We received an incoming webhook from a third-party tool, now we're going to turn around and send a webhook right out from Thrive Automator.
We're going to map our fields just like the supported autoresponders, but this time we have to manually type in the custom field name. For example, if my custom field "Key" was "industry" then I put that into the Key field.
For the Value, click the insert dynamic data icon and then map "Webhook data" and choose the data from the webhook that you want to use to populate the custom field.
Note: If you're using this method, I recommend you set up an action between the Incoming Webhook and Send Webhook actions to Find or Create a User and Add User to a Product. Otherwise using Thrive Automator is just an extra step between your third-party external tool and your autoresponder.
Your automation is now complete!
I was interested in Fluent CRM but stopped because it wasn’t compatible with ConvertBox. This appears to be a good workaround because I use the Thrive Suite. In general, are you happy Fluent CRM?
ConvertBox totally integrates with FluentCRM. They’re completely compatible. You can just use a webhook from ConvertBox to FluentCRM.