Automatic email validation for FluentCRM is an easy way to avoid spam traps, disposable emails, fake emails, and other emails you would not want added to your list.
This particular method I'm going to teach you validates emails BEFORE they reach FluentCRM, which means you aren't triggering any automations or sending email campaigns that will increase bounce rates and have other negative consequences that affect your sending reputation.
Without validating emails, your sending capabilities could be terminated by the API or SMTP sending service you're using like Amazon SES.
I've figured out a way that (1) Actually works, (2) is automated, and (3) handles everything off of my website and doesn't require extra automations in FluentCRM to clean up.
We can break this workflow down into four phases:
- Capturing the email address using a tool that can pass it to other tools via webhook or api.
- Checking the email address and confirming it's valid.
- Sending that valid email address to FluentCRM.
Before we dive into each of these steps, I want to let you know that I have recorded the entire setup process from start to finish so that you watch and follow along. This video will show you exactly how to set up email validation for FluentCRM using the tools and steps outlined in this tutorial.
Capturing and Passing the Email Address
You need to use a tool that can capture the email and then pass it along to the next step. I use ConvertBox (they have a great lifetime deal going on at that link) because it does everything and connects with everything.
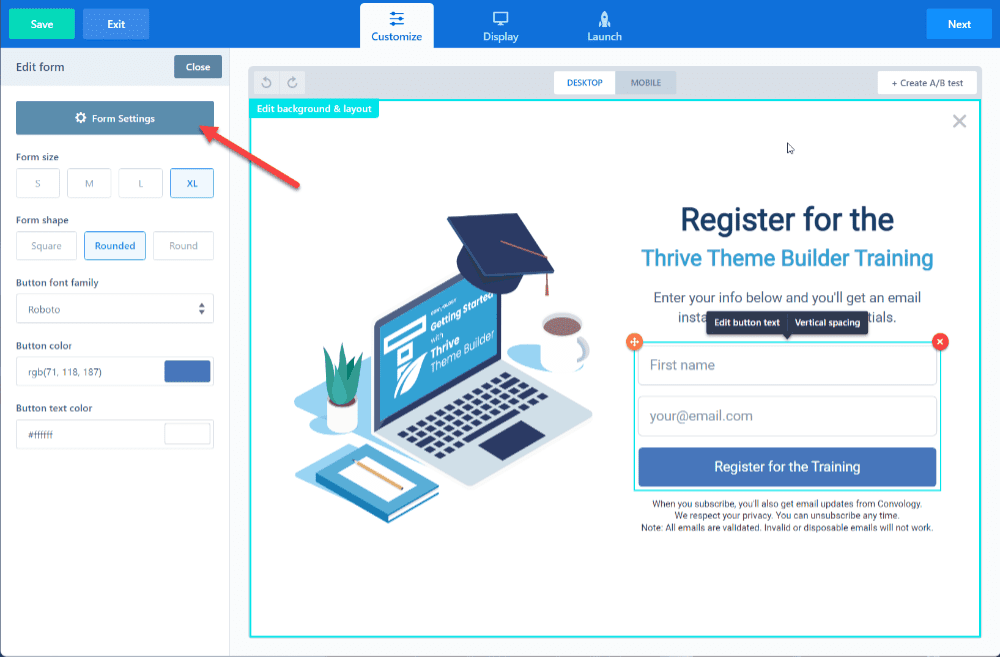
After capturing the email address, the next step is to pass it to an intermediary service so that we can connect it to ZeroBounce and filter out the invalid emails.
I like to use webhooks to pass data between tools. They're easily customized and universally accepted.
ConvertBox lets you easily send the data you've collected.
- Select the form
- Click on form settings
- Integration tab
- Add Integration
- Webhook
Pause here because you'll come back to it in the next step. Open a new tab before we proceed.
Validating the Email Address
The validation step can be broken up into three sub steps:
- Receiving the data from the lead capture tool into our intermediary (we'll use Pabbly Connect)
- Passing the data to ZeroBounce (the tool we'll use to validate the emails)
- Filtering the results from ZeroBounce
Collecting and Organizing the Lead Data in Pabbly Connect
Let's set up the service that will catch our webhook, send it to off to be validated, and then filter the results and send it off to FluentCRM.
We're going to use Pabbly Connect (they have a great lifetime deal here). It's like Zapier, but way cheaper and often has more niche and obscure integrations. It works perfect in this setup.
Here's a sneak peak at what the entire Workflow will look like. If you're a Pabbly veteran, you can most likely set this up on your own.
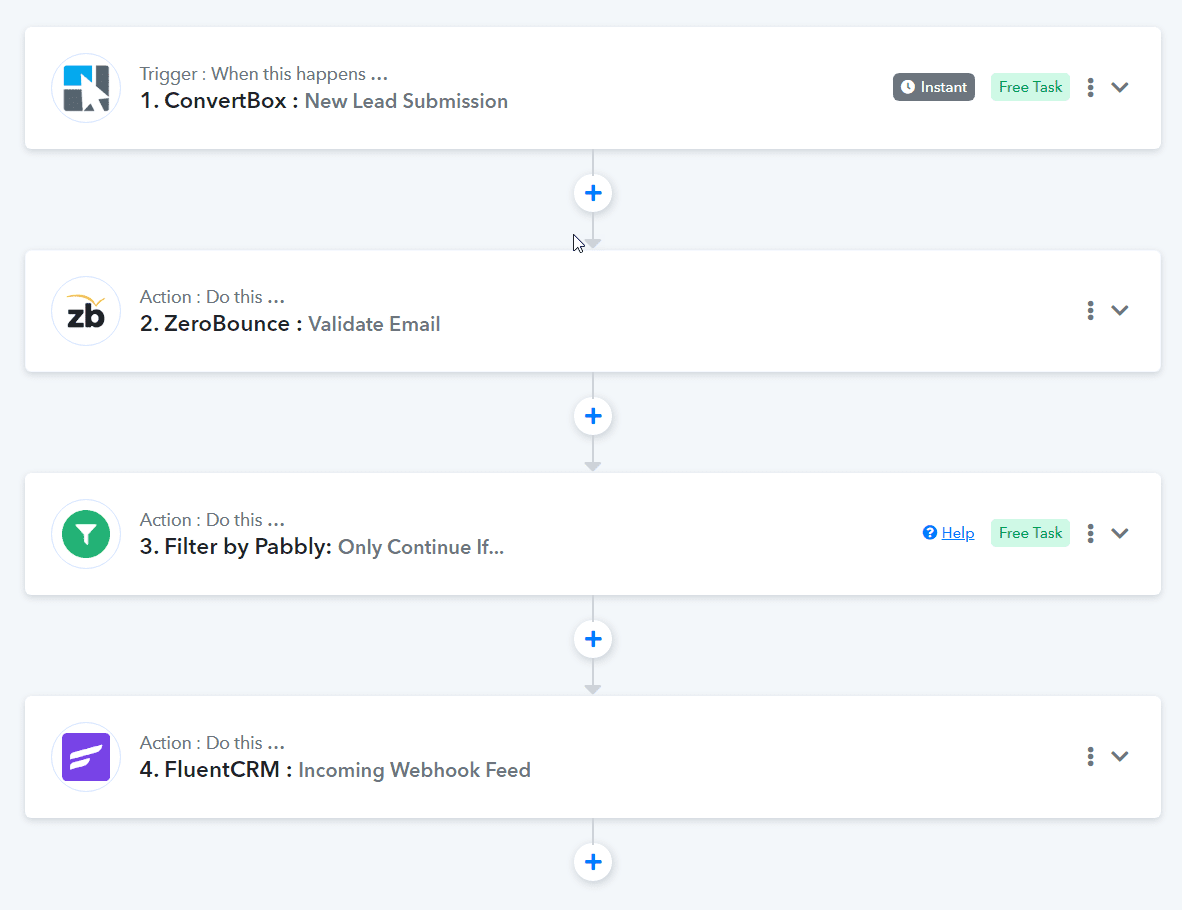
The first step is the trigger to receive the data we collected in the previous step. If you're using ConvertBox, choose the ConvertBox trigger. If you're using another tool, either look for that tool in Pabbly's trigger list or choose API.
I'm going to proceed with the assumption that you're using ConvertBox because the process is extremely similar to all of the other tools.
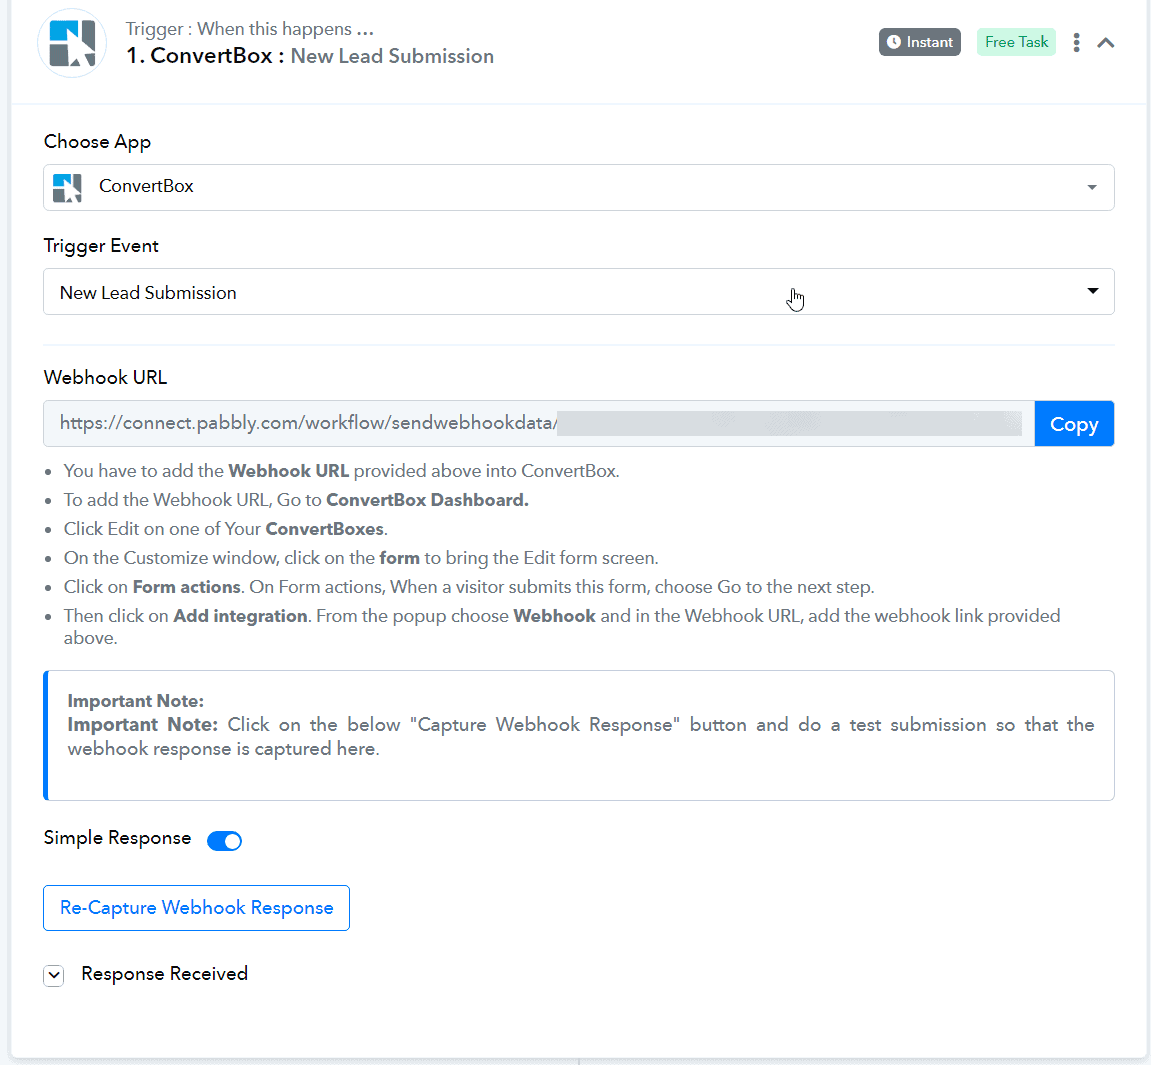
In the ConvertBox trigger choose New Lead Submission.
Copy the webhook URL.
Go back to your tab that you have open with ConvertBox and paste in this url into the Webhook integration on your ConvertBox form.
Come back to Pabbly and click "Capture Webhook Response. Go back to ConvertBox and click "Send Test" in the Webhook integration window. Save and close the ConvertBox webhook integration window and save your ConvertBox. You're now done with ConvertBox.
Pass the Email to ZeroBounce to be Validated
Next, add an action step and search for ZeroBounce in Pabbly.
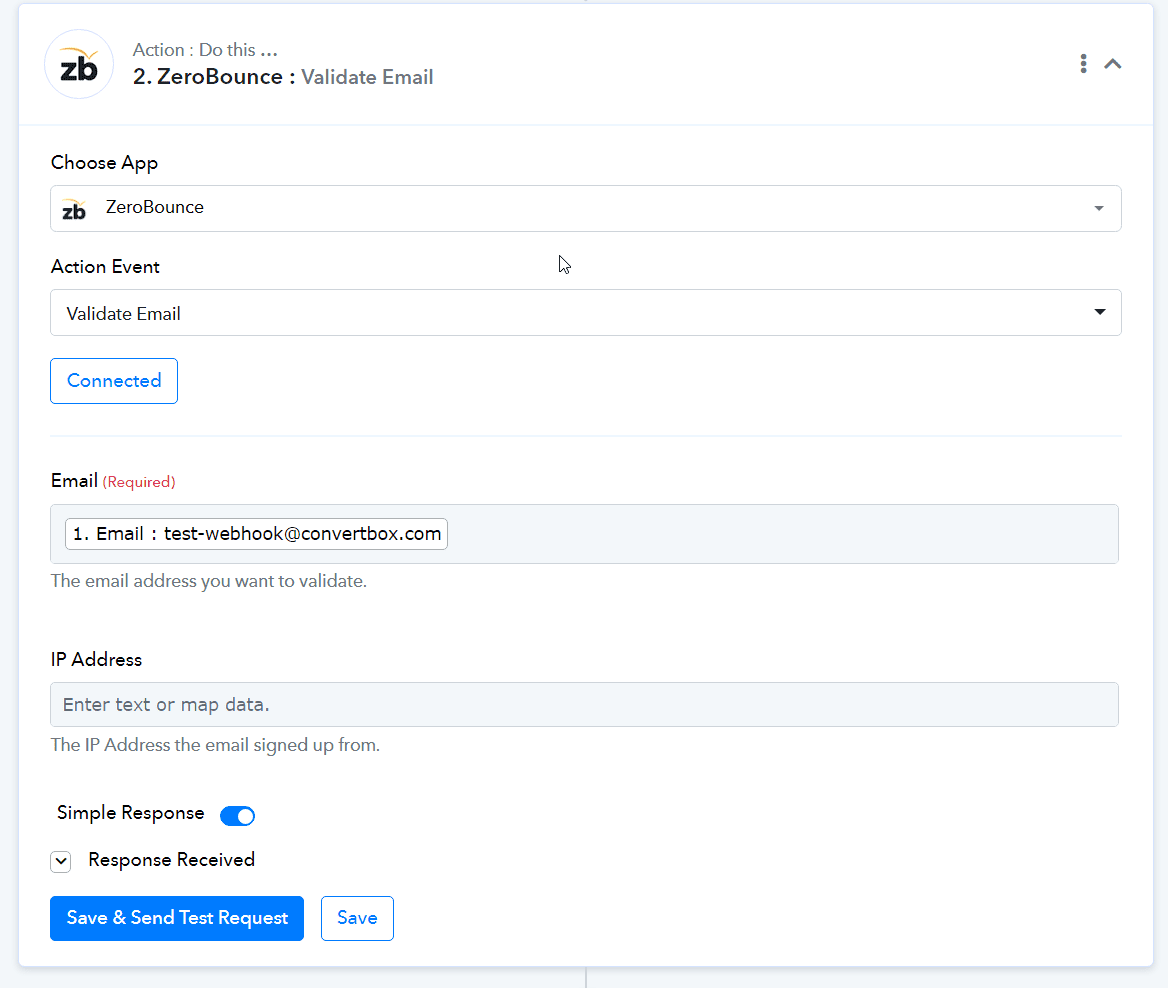
You'll need to connect your Pabbly account with ZeroBounce using your API key. In your ZeroBounce account, find API in the left sidebar, click on it, then click "Create a new API key". Copy this key into Pabbly.
Now we're going to fill out the fields in the ZeroBounce action in Pabbly.
Click into Email and select ConvertBox (or the tool you used to send data to Pabbly).
Select the email field in the data. This will automatically insert the email address that gets sent in the data because it's a dynamic field. Do not manually type anything into this particular field.
Click "save & Send Test Request".
Filtering the Results from ZeroBounce
ZeroBounce has now performed the validation step and sent us back the results. We want to filter those results so that we only proceed within our Workflow if the email is valid.
To do this, add another action to your Pabbly Workflow called "Filter" or "Filter by Pabbly".
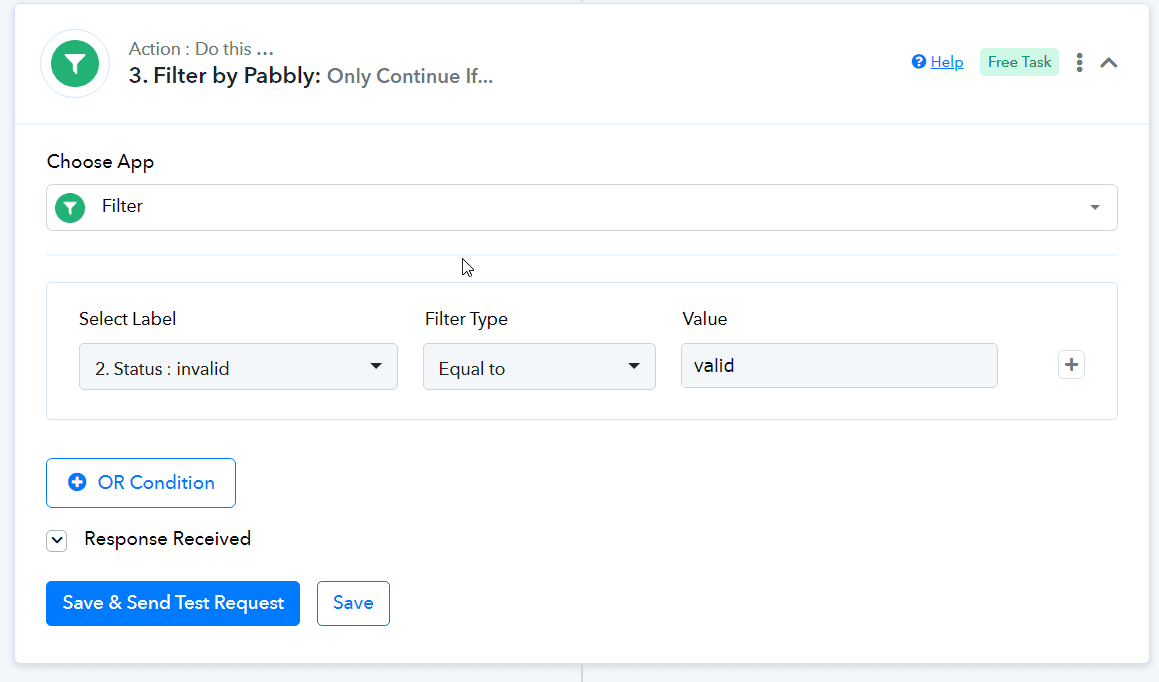
In your filter, you want to select the label for "Status" as shown in the image above. It will automatically show you a result like mine does. It does not matter what the status says for this setup step.
In the Filter Type field select "Equal to".
In the Value field you are going to manually type in (click into the field and then type in manually) the word "valid" (without quotes, all lower case): valid
Click "Save & Send Test Request".
Sending the Valid Email to FluentCRM
Now we're ready to proceed with sending the data over to FluentCRM.
First, we need to create an incoming webhook inside of FluentCRM. Go to your WordPress website and go to FluentCRM > Settings > Incoming Webhooks. Create a new webhook and choose the list and tags you want people to be added to when they sign up. You can re-use these webhooks if you wish. The webhook will look like a URL that you can copy.
Next, Add another action to the Pabbly Workflow and search for FluentCRM. Here's an image of what our setup will look like.
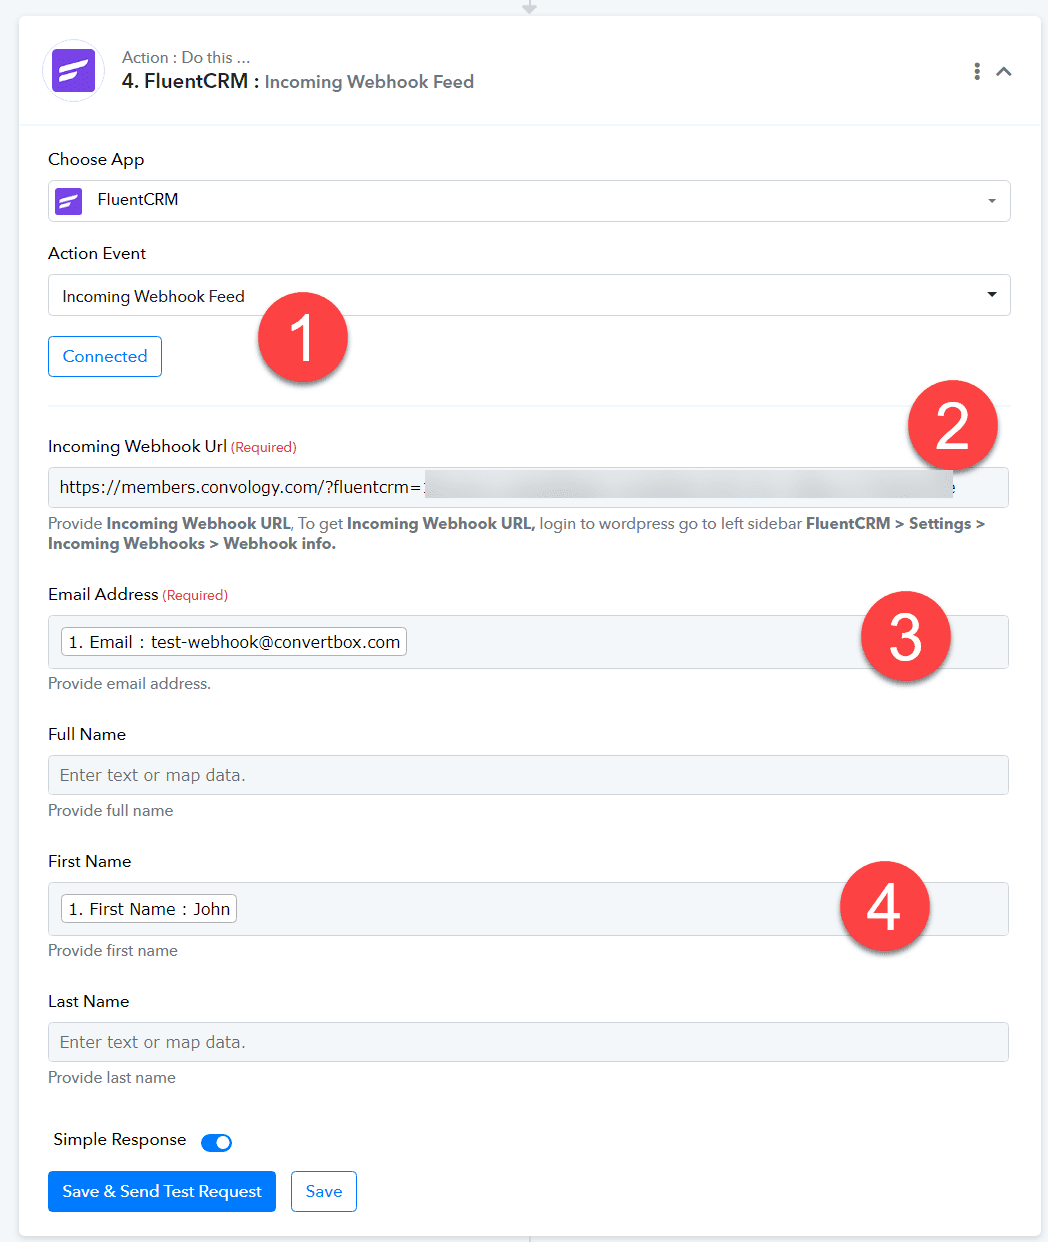
The steps are fairly straightforward and I have identified them with numbers in the image and will itemize them below.
- Choose Incoming Webhook
- Paste in your webhook URL you copied from FluentCRM
- Click into the Email field and select ConvertBox (or whatever tool you used) and choose the Email data.
- Repeat this process for the Name fields you wish to use... I use the first name only
Now you can once again click "Save & Send Test Request" if you want to send this email data over to FluentCRM OR you can simply click Save on this step without testing it. The choice is yours, but I prefer not to send this data over so that I don't have to delete it later.
Last step is to turn on the Pabbly Workflow.
Test Your Validation Workflow
Now it's time to run a test! You can sign up on your own using an email that you know is valid and it should go through and be added to your FluentCRM list and tags that you chose.
You can also try entering an email that you know is fake, or use one of those disposable email sites to get a bad email and run it through the workflow.
With your email validation workflow in place, you can confidently offer lead magnets and newsletter signups to your visitors without worrying about your FluentCRM installation becoming a point of vulnerability for your business.
You can also do this in SureTriggers using ZeroBounce’s API URL.
It’s the same setup, but replace the ZeroBounce step for SureTrigger’s API action using the link below as a GET response & replacing the details.
https://api.zerobounce.net/v2/validate?api_key=replacewithyours&[email protected]&ip_address=
Replace the API key with your own and the email with the address you want to validate. You don’t have to use the IP address, but it needs to remain in the URL to work.
Yeah, that’s a great idea! I’ll create a video on this for SureTriggers users.